The line() function
Line(), is overloaded for drawing in 2D and in 3D. A line function with four arguments draws a line on the picture plane, the screen for current purposes.
line(x1, y1, x2, y2)
draws a line from the point (x1, y1) to (x2, y2).
To draw in 3D we must first setup a 3D drawing environment. Two 3D environments are available and as detailed in XXXX they are invoked by passing an extra argument to the function that sets the window size at the start of the program. You can use either
size(x, y, P3D); or size(x, y, OPENGL);size() can also be called with a P2D argument to get faster 2D drawing than the default JAVA2D environment provides: size(x, y, P2D). At the time of writing P2D did not support all the facilities of the default mode for line drawing. Try its effect using the simple line drawing program we come to in a moment and check the line drawing and attribute setter functions on the Processing website for current details.
With a 3D environment in place use:
line(x1, y1, z1, x2, y2, z2);to draw a line between points (1) and (2) in three dimensional space. The extra coordinates z1 and z2 are the distances of points behind the picture plane. Their depth back from the front face of the screen is another way of thinking about it. If a line is located behind the picture plane and/or tilted in the depth dimension, it will be shown shorter than its length drawn flat on the screen.
The line() functions accept floating point values and can be called with floating point or integer coordinates. Fractional values are rounded to the nearest pixel but casting arguments to integer can be sometimes be useful to smooth jagged parallel line endings e.g:
line(floatX1, floatY1, (int)floatX2, (int)floatY2); // smooth endings at X2, Y2
Line attribute setters
Three functions set the 'style' of the line that will be drawn by the next and subsequent calls to line(). The effect of calling any one of these functions remains in place until the same function is called again. To be able to revert to a previous value we need to make sure the old values are stored. Line style setters and many other functions that modify the drawing environment have a corresponding variable in the current instance of the Processing application interface, called 'g'. To store the current line colour, for example, we can write
int oldColour = g.strokeColor.Accessing variables using 'dot' notation is discussed later, particularly in Chapter ZZ: Object Oriented Programming. To revert to the old colour write
stroke(oldColour);The facility to store and to revert to old settings allows a section of code or a function to draw using settings applicable to the task in hand and restore old settings afterwards - an aid to abstraction discussed later in this Chapter in connection with parametric graphics.
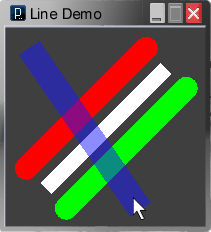
The stroke() line colour setter accepts the same colour and alpha opacity values as the other Processing colour setters detailed earlier in XXXXX. Two other setters affect line drawing: strokeWeight() sets line thickness, strokeCap() the shape or relative location of the end of a line. The program in Listing CC.1 demonstrates the effect of the line style setters.
      /* set window size and drawing environment */

   // declaring constants static final makes sure they
   // cannot be altered by mistake later in the program
   static final int WIDTH = 200;
   static final int HEIGHT = 200;
   static final int OS = 20; // lines offset from edges

   void setup() {
      // size(WIDTH, HEIGHT, P2D);
      // PD2 mode not fully functional in Processing 1.0.2
      // so use:
      size(WIDTH, HEIGHT);
   }

   /* draw in continuous mode */
   void draw() {
      // fill the window with charcoal grey
      background(0.25 * 255);

      /* draw a 45 deg line top-right to bottom-left */
      // set line colour to greyscale white
      stroke(255);
      // set line width to 12 pixels
      strokeWeight(15);
      // make the ends of the line squared off
      strokeCap(SQUARE);
      // draw the line
      line(WIDTH - 2*OS, 2*OS, 2*OS, HEIGHT - 2*OS);

      /* draw two lines same length, parallel to it */
      // rounded ends
      strokeCap(ROUND);

      /* draw a red line 20 pixels wide above */
      strokeWeight(23);
      stroke(255, 0, 0);  // colour red
      line(WIDTH - 3*OS, OS, OS, HEIGHT - 3*OS);

      /* draw a green line 20 pixels wide below */
      stroke(0, 255, 0);  // colour green
      line(WIDTH - OS, 3*OS, 3*OS, HEIGHT - OS);

      /* draw a blue line 50% opaque, width 20,
         top-left to the mouse cursor */
      stroke(25, 25, 255, 255 / 2);
      strokeWeight(25);
      // extend line past cursor point
      strokeCap(PROJECT);
      line(30, 30, mouseX, mouseY);
   }
Listing CC.1

Figure CC.2 Listing CC.1 running.
Running the program note the effect of the attribute setter functions strokeWeight() and strokeCap() for changing line thickness and the shape or relative location of the end of a line as shown in Figure CC.1. Use the mouse to move the blue line over the other lines and note alpha transparency generally and where the lines intersect. Graphics behind an area of transparent colour may appear lighter or darker according to relative brightness values. Try changing the blue line to white, stroke(255, 255, 255, 255 / 2); colours behind are now lightened.


No comments:
Post a Comment